I am building multiple hobby projects every year and for most of those I am using sensors. In the beginning, any available type around me was a perfect fit. But the problem with this thinking was the “time to market”. In other words you have to read the datasheet, create a small test platform and then write your own driver. And this is time consuming! The only good outcome created from this process was the pure learning! You get familiarized with the datasheets, the communication protocols, the making techniques and how to write good drivers!
Now I am following different footsteps! I am using a predefined sensor set that I am constantly reusing over my last projects. The result is a fast “time to market”, a more relax time for the hobby and perfectly made drivers! I am still making things to learn and to widen my knowledge but this is mainly swift to my professional job as an engineer.
So, the result of all those was the sensor stick! A small sensors module that I am using almost everyday so far! Actually, I thought this name was my original “invention” but latter on I figure out that Sparkfun was using this name already! The PCBs was on their way home and somehow I stick with the name because… I like it!
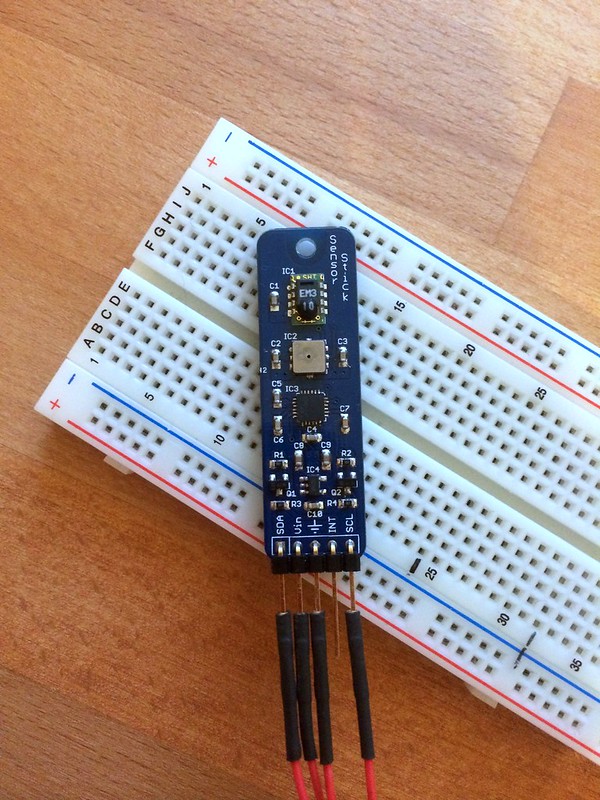
The sensors I am using are the SHT10 that can measure temperature and humidity, BMP085 that can measure pressure, altitude and temperature and finally the “amazing” MPU6050 with integrated three-axis accelerometer, three-axis gyroscope and as the previous ones temperature sensor as well!
All of those are connected to the same I2C bus and interact with each other without any problem using different unique addresses:
MPU6050 (3-axis Guro, 3-axis Accel, Temperature) :
0xD1 read, 0xD0 write
BMP085 (Pressure, Altitude, Temperature):
0XEF read, 0xEE write
SHT10 (Humidity, Temperature):
I2C compatible sensor
The problem with those sensor modules is the power supply that they can handle. Every single sensor has its own voltage range that most of the times are not wide enough or they are at the low levels and not suitable for the 3.3V to 5V most commonly used for hobby (and not only) projects.

The solution is to first find a “sweet” voltage spot that can be handled from all the sensors. Then, use a local LDO regulator with wide acceptable input and capable to produce this common sensor voltage. The result is that you have solved the first part of the problem. The power supply! For this module the voltage range is between 3V to 6V. A wide range for “any” project out there!
And now its time for the digital IO’s voltage lever solution. For the sensor stick those are the two I2C lines, the Data -> SDA and the Clock -> SCL. Depending of the sensors set used, this can be an easy answer or a little bit trickier one.
You can use just pull-up resistors to set the high level but some ICs on the same bus probably can’t handle it, or you can use a lower high level voltage even if its not the Vin in case that this is inside the understandable logic 1 range. For the logic 0 you don’t have to think a lot. It’s always tide to ground (for common projects and “normal” protocols).
My solution is to use a logic translator. You can’t find them in multiple packages and multiple price tags. But the simples ones are to the ones you can build by your own with basic components. In other words a singe mosfet (2N7002) with two resistors can do the job easily! Plus, this logic translator is also a two way one!

If you like this module then hit the like button bellow! If you have any question type it bellow and I will have an answer as soon as possible! For any other info drop me a mail on: john_kedros@hotmail.com with the subject: SensorStick

By the way, I know a few people that they are trying to keep modules like this one clean after use in a lab or from a project that was operating outside for a long time. As a cleaning solution they are using alcohol or other PCB type cleaners. Pay attention to this! Sensors like the BMP085 and the SHT10 or any other slot type sensors are extremely sensitive to chemicals, even to the not so aggressive ones!
For example if you wipe the surface of the BMP085 sensor with a paper with just a few drops of alcohol the probability to destroy the sensor and to return continuously the same data (mostly negative values) is extremely high! If you want to clean slot type sensors then just use a dry cleaning towel and be careful with the static electricity.
Schematic: SensorStick PDF
Code examples, some of the best ones out there (in C/C++):
MPU6050
BMP085
SHT10
and Python:
MPU6050
BMP085
SHT10
Or for any question mail me at: john_kedros@hotmail.com
If you are interested for a Sensor Stick have a look here:


I could see this be built into an anemometer/wind direction device for a compact weather sensor . :)
I am already using it for a weather station like project with a Raspberry Pi!
Hello,
Thanks a lot for sharing your sensor stick with the community. Do you also plan to open source the layout and the firmware too?
Hi rifo!
You can find the schematic at the end of the article and yes I am planing to open source the layout as well! As for the drivers, I still don’t know what I have to do… but probably the C drivers will be here soon.
For now I have a few assembled modules in my “lab” and I will put them on the Surplus section of the blog.
Hopefully it will be on Tindie soon!
That’s great news!!
I’ll be sure to get a couple of them.
Nice. Let me know as I have a few folks that would be interested in buying one,
@Kevin @rifo Have a look in the surplus section if you are interested for this module: http://embeddedday.com/surplus/
just sent you an email regarding this:)
You should replace the mpu6050 with the 9150 that has a magnetometer included with the gyro and accelerometer. That would make a great sensor stick for playing with autonomous vehicles, drones, etc. Nice design btw :)
Hi Matias! Really thank you for your advice!
I know about the MPU9150 (it is an amazing MEMS IC), but this sensor will create a big price increase compared to the cost of this module. For example you can find the Sensor Stick on my Surplus section for $42 per module.
The price sounds like a lot but trust me it’s really underpriced for those types of sensor modules! The sensor ICs are extremely expensive parts, except if you are dealing with 1000+pcs production per day!
Probably in the not so close future I will make a module with this sensor as well but not for now!
For any other advice or suggestions then please hit me with comments! And I don’t mean from just you but from everyone!
I am really interested to find out what you thing about the module, or the website in general, or for design suggestions for current projects and future ones… or for just to say hello!!!
Nice sensor array.
I’m new to the world of DIY electronics. I have seen the mosfet level conversion elsewhere but did not understood it until I saw your shematic. I’ll order some 2N7000 (I’m not yet ready to SMT components) to experiment experiment.
By the way, are you aware of the BME280? Is suposed to be a next generation BMP085 for pressure, temperature and relative humidity.
Hi Alvaro!
I am glad that I transfer a little bit of knowledge to someone! Mosfet conversion is really handy for various projects. Of course depending on the mosfets, the Vhigh – Vlow and the pull ups of your choice the maximum speed will be affected. But you don’t have to worry for project like this one.
DIY electronics is an amazing hobby and you should carry on!
A quick message to everyone!
I’ve received a few mails about the Sensor Stick module saying that this is my second (or sometimes third) mail to you, as the first one didn’t get answered by me!
Actually I’ve already answer all the mails about this module, even to the ones that stuck to my mail filter somehow! Please, have a look of your mails and spam filters as well!
I already send replies to the second mails as well (defining that I’ve send an answer before as well) but probably those will get lost again in the spam settings as it happened with the originals!
Many thanks in advance!
[…] If you follow [Ioannis'] lead you’re going to thank yourself every time you sit down to work on a new prototype. He took all of the sensors which he most commonly uses and spun one dev board to host them all. […]
[…] If you follow [Ioannis'] lead you’re going to thank yourself every time you sit down to work on a new prototype. He took all of the sensors which he most commonly uses and spun one dev board to host them all. […]
[…] If you follow [Ioannis'] lead you’re going to thank yourself every time you sit down to work on a new prototype. He took all of the sensors which he most commonly uses and spun one dev board to host them all. […]
[…] If you follow [Ioannis'] lead you’re going to thank yourself every time you sit down to work on a new prototype. He took all of the sensors which he most commonly uses and spun one dev board to host them all. […]
This looks very cool! Quick question: who do you go through to make the PCB? Do they also do the assembly or do you do that yourself?
Thank you Nipun!
The PCBs are made from various fab shops depending on the project I am working on, the quality, the price and how quick I want them to be on my hands. Sometimes I am using fabs from abroad and sometimes I using local ones.
You can find PCB manufacturers that they will do PCB assembly (PCBA) as well and nowadays even the cheap ones are starting to offer those services in competitive prices.
For my hobby projects I am always doing the assembly personally in my “lab”. You can order laser cut metal stencils and together with good quality solder paste you will do the job without any problem! Pay attention (and a fair amount of money) to the quality of the paste. It’s a day and night difference compared to cheap ones. Of course, you need a PID controlled oven as well but you can make one from spare parts
Thank you for the quick reply! it didn’t even occur to me to laser cut some stencils but I’ll definitely look into it.
Hi. Do you ave any good guide online for the MPU6050? Or maybe a little code to get it running?
Hi Ted!
I will upload a few code examples probably next week!
But if you do a good search you will find multiple MPU6050 drivers and examples, developed in C, C++ or even Python.
For example:
http://www.i2cdevlib.com/devices/mpu6050#source
http://mbed.org/users/Sissors/code/MPU6050/
https://github.com/cTn-dev/PyComms/blob/master/MPU6050/mpu6050.py
[…] the weather data, he’s using another design of his – the Sensor Stick. This nifty device — which we featured over the weekend — is about the size of a stick […]
Awsome give me one please
Where can I get the schematic? I’m not allowed to download it from Dropbox
Thx
Hi GG,
If you are interested for one send me a mail here: john_kedros@hotmail.com
I just check the link for the schematic and works great (download too)! Is it possible to check once more?
I think you have to reshare the document because Dropbox had an error with referrer in documents and disable all public documents.
FYI http://www.zdnet.com/dropbox-patches-shared-links-security-flaw-7000029110/
Download: Fixed!!!
Can anyone confirm it?
I’ve check from two computers and now is working fine!
I’d like to find out more? I’d care to find out more details.
The link is fixed. I can download the file. Thank you.
It’s actually a nice and useful piece of information.
I’m happy that you just shared this helpful info with us.
Please stay us up to date like this. Thank you for sharing.
I do not even know how I ended up here, but I thought this post
was good. I do not know who you are but certainly you are going
to a famous blogger if you aren’t already ;) Cheers!
That is a really good tip particularly to those fresh to the blogosphere.
Brief but very precise info… Thanks for
sharing this one. A must read article!
Has anyone managed to make the mpu6050 embeded en this stick working with arduino?
I’m not that much of a online reader to be honest but your blogs really nice, keep it up!
I’ll go ahead and bookmark your website to come back later on. Many thanks
Hello! I could have sworn I’ve been to this website before but after browsing through
a few oof the poosts I realized it’s new too me.
Anyways, I’m certainly pleased I came across iit and I’ll be book-marking it annd checking
back regularly!
[…] started with a board that incorporates several […]